SMARTePLANTS - Setup Guide and Instructions

Please read all the instructions contained herein to ensure maximum performance and enjoyment of SMARTePLANTS.
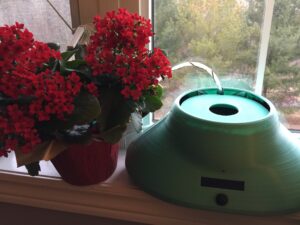
SMARTePLANTS is designed for indoor plants of standard size, whose pots have diameters at the top of 10-25 cm (4-10 inches). To fit properly on top of SMARTePLANTS, the diameter of the pot base of the central plant (“plant 1”) must be less than about 14 cm (5.5 inches).
Whenever connecting plants to SMARTePLANTS, follow the simple steps below.
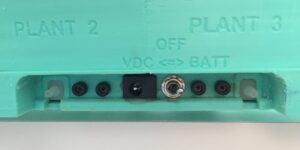
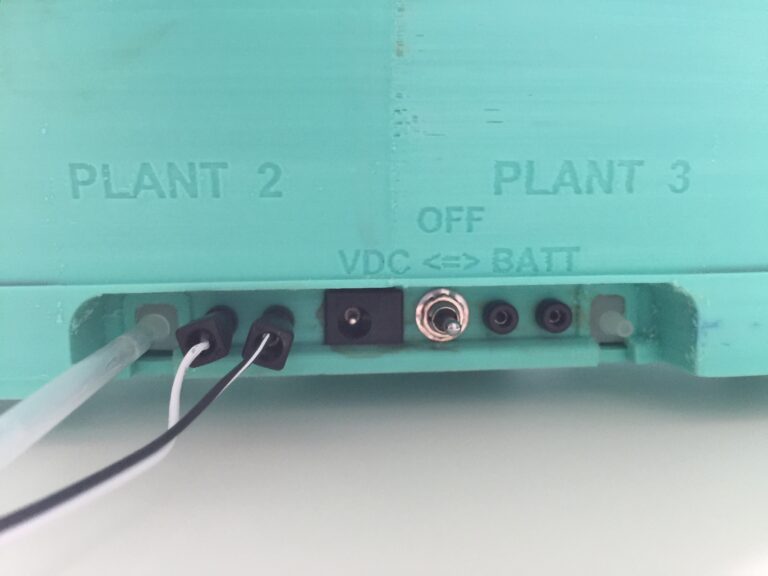
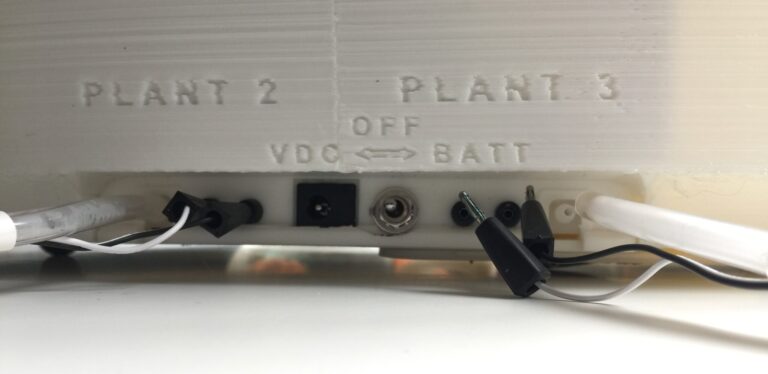
Step 1: Ensure the toggle switch at the back of SMARTePLANTS is in the centered OFF position.
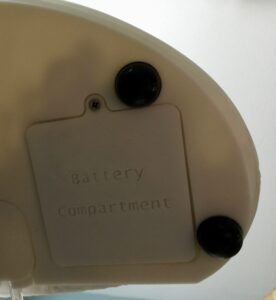
Step 2: If wishing to use battery operation*, place 4 fresh AA-size batteries in the Battery Compartment which can be accessed using a small Phillips-head screwdriver at the bottom of SMARTePLANTS. Energizer® Ultimate Lithium™ batteries are recommended as they have a longer life than alkaline batteries.
Step 3: Position** SMARTePLANTS wherever you like – on a window sill, coffee table, side table, etc. If you plan on using the power adapter, ensure you are near a 120v outlet.
If connecting only one plant, and placing it on top of SMARTePLANTS,
skip to Step 5.
Step 4: Connect the clear plastic water tube from an integrated moisture/watering probe to the back of SMARTePLANTS at the location labeled “PLANT 2”. Push and twist the end of the tube clockwise and push and twist counterclockwise onto the barbed connector. Do this 2-3 times to ensure the tubing is securely attached. Then push in the two moisture electrical signal banana plugs into the banana jacks (sockets). Either plug can be inserted into either of the two jacks.
Repeat for PLANT 3.
If PLANT 2 and/or PLANT 3 are not connected, be sure to attach the simple plugs that were shipped with SMARTePLANTS to the unused barbed connector(s) to prevent water dripping.
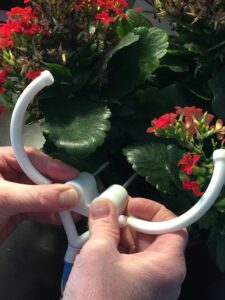
Step 5: Place the central plant (Plant 1) next to SMARTePLANTS. The integrated moisture/watering probe has flexible water distribution arms to allow easy and flexible adjustment around or within any type of potted plant. *** While positioning the adjustable arms, push the 2 stainless steel threaded moisture probes firmly into the soil until the probe handle rests on the soil. Place Plant 1 on top of SMARTePLANTS on the circular support platform.
Similarly install the integrated moisture/watering probes for Plant 2 and Plant 3.
Step 6: If using the power adapter (i.e. not using batteries), plug the DC power barrel connector into the barrel jack (labeled “VDC”) next to the toggle switch. Plug the power adapter into the 120 volt wall outlet.
Step 7: Lift Plant 1 slightly to the side to gain access to the water reservoir top-up hole in the circular support for Plant 1. Using a small watering can, or other water container, pour water into the reservoir. Do not fill the reservoir higher than the top of the water level indicator on the side of SMARTePLANTS.****

Step 8: Water the plants manually. This is required in order for SMARTePLANTS to be able to detect the presence of the plants, and for the important calibration required for all new, first-time plant connections.
Step 9: Move the toggle switch from the centered OFF position to the “BATT” position for battery operation, or to the “VDC” position for wall power. The photo shows the toggle switch in the Battery (BATT) position.
Step 10: SMARTePLANTS now goes though its start-up sequence. There are two particularly important user-inputs:
- setting the desired low moisture threshold that specifies when each plant is to be watered, and
- plant calibration mainly for first-time installations

Follow the prompts. The start-up sequence is as follows:
- Startup display “SMARTePLANTS starting up….”
- Option to adjust LCD display contrast, if you wish
- Detection/confirmation of connected plants
- Display message reminder to ensure the toggle switch is set to “VDC” to ensure batteries are not being used by mistake (Message displayed only if the power adapter is plugged into the barrel jack).
- The low soil moisture thresholds are displayed for each plant. These thresholds are used to trigger the start of plant watering. Follow the prompts if you wish to change the values. The Plant Watering Guide (see separate document) can be used for guidance, as different plants have different watering preferences. Around 50%-60% is a good place to start for many plants.
- Option to calibrate. Due to varying soil types, it is essential to calibrate the first time a plant is connected. It is also suggested to calibrate whenever the moisture probes are moved or removed and re-inserted. Follow the simple prompts. Be sure to thoroughly water manually all those connected plants which are to be calibrated (if not already done so when setting up) when prompted.
The low moisture threshold values and calibration values are saved and kept in SMARTePLANTS’ memory even when it is turned off. Therefore, these operations do not need to be performed again if SMARTePLANTS is simply turned off and on again and there have been no changes to the connected plants or probes.
After the start-up sequence, the moisture level of each plant is displayed along with the number of days since the previous watering (zero days if a calibration has just been performed).
The display then turns off and SMARTePLANTS begins its automated, quiet, intelligent, worry-free monitoring and watering!
Normal Operation
To conserve battery power, SMARTePLANTS actually sleeps most of the time, waking up automatically every 8 hours to check the plants. To wake up SMARTePLANTS at any time, simply press the button. In addition to displaying the current moisture level for each of the connected plants, and the number of days since the previous watering, any existing alert messages (see Appendix A and B) are displayed.
After a manual watering and calibration of a first-time set-up, the moisture readings for the connected plants will be around 110%, representing thoroughly-watered plants. When a plant’s moisture drops below the low moisture threshold value set during the startup sequence, SMARTePLANTS will initiate a pump cycling, watering the plant until the moisture reaches between 100% and 110%.
Occasionally you may wish to (1) adjust the low moisture threshold for one or more plants, or (2) perform a re-calibration. In these cases, re-run the start-up sequence. To re-start, either:
- turn the toggle switch off, wait 5 seconds, and then on again, or
- press the button to turn on the display; continue to push the button for about 3 seconds
In normal operation, SMARTePLANTS requires no intervention other than occasionally adding water to the reservoir. When the reservoir water level is low, SMARTePLANTS will try to attract your attention by issuing periodically (about every two and a half hours) a beeping sound and a flashing of the indicator light. After topping up the reservoir, pressing the button will re-set the low reservoir water alert. The reservoir water level can also be monitored by viewing the water level indicator on the side of SMARTePLANTS.
If you find that your plants are being watered earlier or later than you think is best, re-start SMARTePLANTS and adjust the low threshold values accordingly.
The table in Appendix A summarizes the alerts that SMARTePLANTS may occasionally provide.
The table in Appendix B is a trouble-shooting guide regarding abnormal behaviour that may rarely occur.
Additional Guidance
- If and when emptying water from SMARTePLANTS, try to keep water away from the front of the reservoir. It is recommended to tilt the pot towards the side and rear when pouring out water.
- Whenever disconnecting any plants, first turn SMARTePLANTS off.
- Watering occasionally manually can extend battery life significantly, by reducing electric pump usage.
- When disconnecting a plant and removing a water tube from the barbed connector at the back of SMARTePLANTS, water remaining in the tube may drip out. To avoid this, place your finger over the end of the tube immediately after removing it, and then allow the water to drain into a small container or cloth. Afterwards, attach the simple plugs that were shipped with SMARTePLANTS.
- In some cases, low-battery symptoms will appear before SMARTePLANTS issues a low battery alert. These symptoms include:
- SMARTePLANTS does not turn on, even after multiple attempts
- the blue display is on, but with no visible text
- SMARTePLANTS repeatedly resets and goes through the startup sequence. (This may happen when watering is required and pump turn-on is initiated.)
To confirm that low batteries are the cause of these behaviours, plug in the wall adapter and move the toggle switch to “OFF” for 5 seconds, then to “VDC”. If VDC operation is normal, then continue to use VDC, or replace the batteries with new ones.
Appendix A: Normal Operation Alerts
Alert # | Display Message | Indicator light | Recommended Action: |
1 | “ WARNING Reservoir Low” | yellow | · Add water to the reservoir soon |
2 | “WARNING Reservoir… | yellow | · This warning occurs when the reservoir water level is low, AND when either: (1) pump was on longer than expected, or (2) watering stopped earlier than expected · Check reservoir. If empty, add water immediately. |
3 | “ WARNING Batteries Low” | yellow | · Replace batteries soon, or · Switch to using the wall power adapter (VDC) |
4 | “Plant moisture 2% from watering” | blue | · The plant soil moisture level has dropped to within 2% of the low moisture threshold set during start-up. · Water manually, if you wish. Otherwise, no action is required (manual watering extends battery life). |
5 | “Plant # watering stopped early” | blue | · During watering, the plant soil moisture did not reach the expected 100%-110% level.***** · This alert occurs after 12 hours of a plant watering. · The following is optional, but if the warning recurs repeatedly during the subsequent few weeks, it is recommended you follow the simple steps below: 1. Ensure the moisture probes are pushed all the way in the soil with the probe handle firmly resting on the soil. 2. Press the button to see the soil moisture level. · Soil moisture is greater than 102%: i. If Yes, no further action is required ii. If No, continue to next step. 3. Water manually · Press the button to see the soil moisture level · Soil moisture is greater than 102%: i. If Yes, no further action is required ii. If No restart SMARTePLANTS and, perform calibration |
Appendix B: Abnormal Behaviours
In rare cases and circumstances, if SMARTePLANTS senses something abnormal, it will automatically disable the automated monitoring and watering of one or more plants, but continue the normal monitoring/watering of the remaining plants. To gain your attention, SMARTePLANTS will beep (chirp) and the indicator light will flash red as a warning every approximately 2.5 hours. For operation using wall power, the red indicator light stays on as a continuous reminder until the issue is corrected. Pressing the button will display first the plant soil moisture values of any plants not disabled, followed by a brief description of the error with a suggestion on how to remedy it.
A troubleshooting list of all possible abnormal behaviours and their possible causes/fixes is provided below:
Troubleshooting Guidelines
Issue | Display Message | Check: |
1 | “No plants detected” | · Moisture sensor banana plugs connected · Moisture probes inserted properly in soil · Plants watered (not completely dry) |
2 | “ Too dry at start” | · At startup, water plant(s) manually |
3 | “Moisture | · Moisture sensor banana plugs connected · Moisture probes inserted properly in soil |
4 | “Pump on too long” (during watering) | · Moisture probes inserted properly in soil · Water tubes connected properly · Batteries low (if using batteries) · Reservoir may be empty · Plant pot larger than recommended |
5 | “Moisture dropped” (during watering) | · Moisture sensor banana plugs connected · Moisture probes inserted properly in soil · Water tubes connected properly |
6 | “Watering too slow” (during watering) | · Moisture probes inserted properly in soil · Water tubes connected properly · Batteries low (if using batteries) · Reservoir may be empty · Plant pot larger than recommended |
Notes:
* Based on testing to-date, a fresh set of Energizer® Ultimate Lithium™ batteries should last about 7-9 months for average single plant watering, and 2-3 months for average 3-plant watering. (Four new AA batteries have been installed in the prototype at time of delivery.)
** The SMARTePLANTS prototype has been manufactured using 3-D printing technology, not plastic injection molding which is typically used for high-volume manufacturing. Therefore, the prototype required a liquid rubber waterproofing treatment to prevent water leaking. Please monitor occasionally for any small drips to prevent any damage to the table surface. If leaking occurs, please disconnect SMARTePLANTS and return so that I can remedy the problem.
*** If an arm happens to fall off during installation – no problem! Simply re-attach by pushing/twisting back on.
**** It is recommended to initially fill the SMARTePLANTS prototype only half-full. If after a few weeks of use, there are no signs of leakage, SMARTePLANTS can be filled further.
***** The objective is for SMARTePLANTS to automatically water until the soil moisture level is 100%-110%. There are many possible reasons why watering may stop before reaching this level. These reasons include:
- probes not pushed all the way in
- reservoir may run dry during watering
- soil very dense (high clay content) and water does not easily diffuse in the soil
- over time, probes may begin to corrode changing their resistance characteristics
- the arms of the integrated moisture/watering probe may not be distributing water uniformly
- watering software algorithm needs tuning/modifying
If/when this warning alert occurs, I would appreciate you documenting the circumstances and what you did (if anything) to clear the warning. Thank you!